Label Colour Trapping: How to Approve the Printed Edge
Approve the printed boundary between two label colours with a converter's returned separation proof and, when the edge matters on shelf, a finished sample. Trapping can cover a small potential gap between adjoining printed areas by adding an intentional overlap. The converter should propose the treatment for the actual press, inks, stock and artwork.
Mark the edge that has to look clean
A coloured panel that meets a second colour can expose the substrate if the two ink areas shift apart. An intentional overlap can preserve coverage within a limited amount of relative movement. The overlap can also appear as a dark or coloured rim, depending on the ink combination. Esko's trapping introduction shows why adjoining separations need review when registration varies.
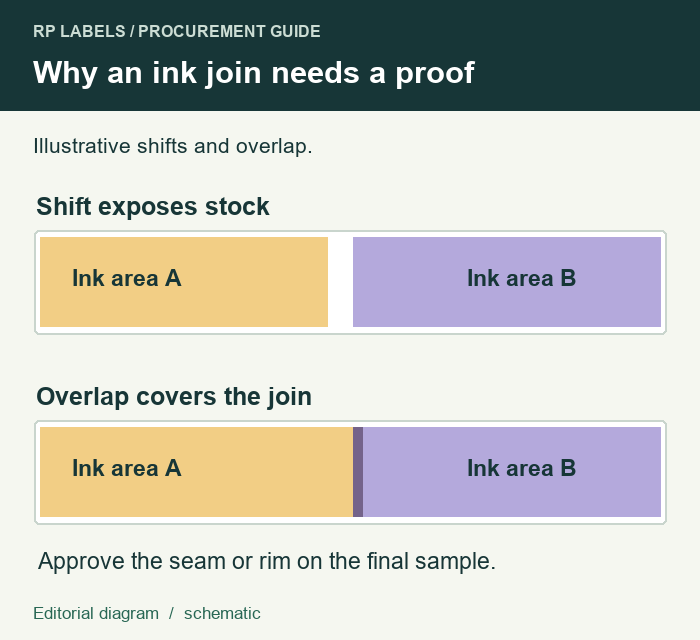
Circle the affected edge on the final-size artwork. Is a light seam unacceptable? Is a visible mixed-colour rim more objectionable? For example, a large background join may tolerate a narrow overlap that would spoil a fine reverse letter. Ask the printer to quote a simpler artwork or edge treatment if the original detail cannot be held reliably.
Keep three separate boundaries on the proof
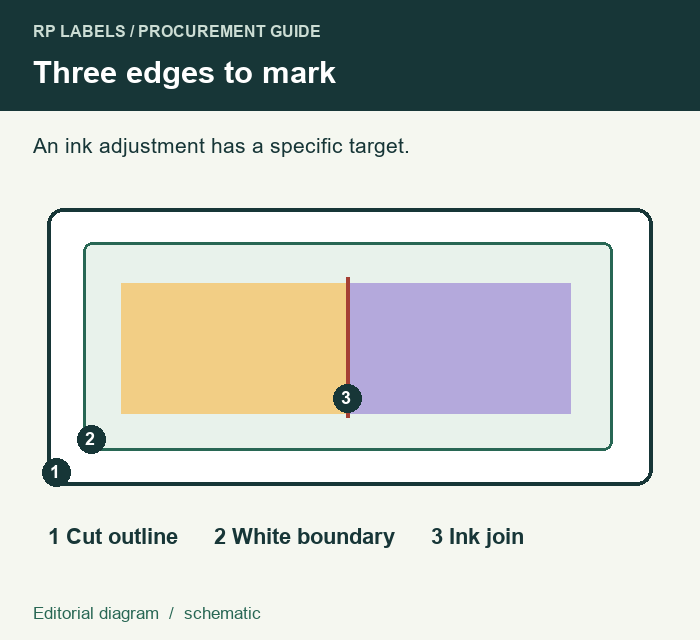
Review the ink-to-ink join where adjoining colours meet, the underprint boundary where white ink supports another area, and the cut line that defines the finished outline. An adjustment at one boundary does not resolve the other two. For transparent vial labels, use the white ink guide to agree where the bottle can show through. For PDF object behavior and separations, use the overprint proof guide.
For a rich colour touching a pale area, the converter may propose pulling one or more ink components back from an exposed edge. This is a different geometric adjustment from adding overlap between adjoining colours. Esko's trap and pullback documentation gives a specific prepress example. Ask the converter to identify which separations are affected, especially near small copy or code clear space.
Review an annotated proof and an applied sample
Ask for the returned proof revision, a close view of the named edge with separations identified, and the proposed treatment tied to that job. Review the close view to understand where the inks extend. Then inspect the applied sample at normal viewing distance. Confirm with the converter whether the sample represents the intended production construction. A decorative mockup may be useful for design approval while the production edge remains open.
If the trial shows a light slit or a dark fringe, record which edge is affected, the sample identifier and the accepted viewing conditions. Ask the converter whether the correction should be made in the artwork, the prepress treatment or the press setup. When a small character or code becomes less readable, have the relevant owner recheck that element before approving the change.
Get the edge requirement into the quote
Send RP Labels the actual stock or container reference, an editable artwork revision, the marked edges, quantities per design and the requested proof scope. Ask who will apply the adjustment and which job-specific evidence will be returned before release. A saved proof and a named sample let a later reorder use the accepted edge as its reference.